These series of posts are going to cover bebop scales and
possible uses – so let’s jump right in.
As a quick refresher: the bebop era of jazz grew from the trends taking place during the 1930’s in the United States, but didn’t become fully developed and established till the 1940’s. During improvisation, some players would use the convenience of these “bebop scales,” which were no more than diatonic scales with a single added chromatic passing tone in-between to push chordal tones on downbeats.
So, now let’s take a look at the dominant bebop scale:
Note that the scale degrees are | 1-2-3-4-5-6-b7-7-8 |
The dominant bebop scale can work great over V7, ii7, and vii7(b5) chords in the key. Also, ii – V progressions as well! However, experimentation is encouraged, as this is just a jumping point to start from. Also, building creative lines using the bebop scale should NOT use EVERY SINGLE note. Add space.
Thank you so much for taking the time to read! Feel free to
comment, share, and subscribe for more daily tips below! Till next time.
In my personal opinion, upcoming composers never lack in having enough original materials & ideas for new works of music. However, a good portion of them do lack in the skill of seamlessly transitioning from one idea to another (unless that stark contrast is desired – but it shouldn’t happen all the time, as abrasive transitions sound cheap on the composer’s part over time).
Think of this technique of solving this problem like those apps that take two photos and fuse them together by finding the commonality point in the middle. The same thing can be done with musical figures/themes. Take two separate ideas and look at their shape, intervals, repeating patterns, contour, pitches, etc.
Take note of the similarities and differences between the two. Some stuff may overlap. Now, combine those aspects in different ways. Observe how each “offspring” figure has a commonality with each of the “parents.”
Thank you so much for taking the time to read! Feel free to comment, share, and subscribe for more daily tips below! Till next time.
Well, that title certainly is a mouthful. But it is just a fancy way of saying “call & response.” Everyone has probably experienced some form of practicing call & response, as it is used in blues, camp songs, jazz improvisation, polychoral music, and more. One voice (or group) plays one thing as the “call,” and the other voice plays something back as the “response.” While the “response” can be an absolute copy of the “call,” this tip post will feature different opportunities of contrast.
First: different registers. It is a bit easier incorporating this when you have a large ensemble; but even with a single instrument try bouncing between the two low/high extremes of the voice range.
Second: different intervals. Simply put, one theme can be all stepwise in motion, while the other uses leaps.
Third: different contours. Contour is the shape of the line. So, one can go in one direction while the other goes in the opposite.
Fourth: different instruments. Every instrument has their own timbre, or color of sound. Alternating between the voice-like sound of a high-registered cello and a breathy low-voiced flute can be a beautiful contrast.
Fifth: different techniques. Not only do instruments have their own unique timbre, but they also have their own techniques, too. String instruments can both be plucked and bowed, and alternating between the two possibilities in a call & response format can bring beautiful contrasting colors as well as highlights to the melody.
Thank you so much for taking the time to read! Feel free to comment, share, and subscribe for more daily tips below! Till next time.
Or vice versa! Maybe you already have the chordal harmony, but are looking to see if playing a lead line over in a phrygian-dominant mode is appropriate.
The phrygian-dominant scale is a mode based off of starting from the fifth degree of the harmonic minor scale. So, to remind, a harmonic minor scale looks as such:
And if you were to start from the fifth degree, it would not look like this, becoming the phrygian-dominant scale:
Notice that the scale degrees are | 1 b2 3 4 5 b6 b7 1 | and what chords can be derived from them. The strongest chords built when playing in this mode are:
Harmonic movements between I – bII , and I – bvii are good indicators to the ear that you have now dove into the world of phrygian-dominant.
In the case that you are in a regular major/minor kay, but want to incorporate the phrygian-dominant, look to add chords like: 7alt , 7(b9b13) , V7/III , and V7/VI . These best fit the pitch collection of the mode. Also, a VImaj7 chord can possibly work if the melody has a raised sixth being approached from above.
Thank you so much for taking the time to read! Feel free to comment, share, and subscribe for more daily tips below! Till next time.
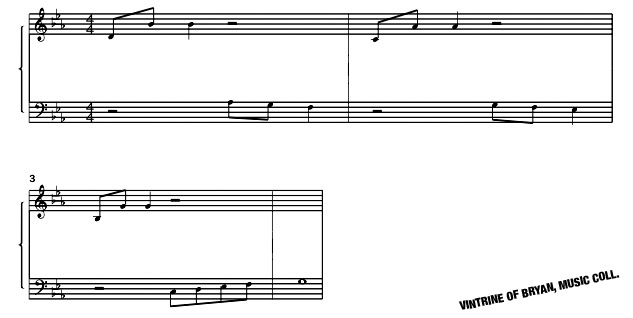
In chord voice-leading, the bass note has the most flexibility on how/where to move. While there are some strong suggestions to keep bass motion at intervals small – like under a perfect-fourth – there is certainly more leeway for a bass not in a chord to make large intervallic leaps… as opposed to inner voices and melody, which should move stepwise.
Now, what if these roles were reversed? Given, jumpy upper voices in a chord can sound a bit out of place; however, having the bass line be crafted like a melody can yield cool results of a smooth transition from one chord to another.
Take a chord progression for example:
After deciding on a progression, my next piece of advice is to find common tones between the chords as well as adjected notes by at most a minor third (though M3 and P4 can work, too). Make a note of all the possibilities. From there, write a melody within the harmonic rhythm that is smooth and overall stepwise in motion. Then, let those be the root positions and/or inversions of the chords you previously chosen.
Rest is there for you from there on out on how to play around with the upper voices and melody, but now you have a melodic line in the bass that can be used as a motif a basis for variation.
Thank you so much for taking the time to read! Feel free to comment, share, and subscribe for more daily tips below! Till next time.
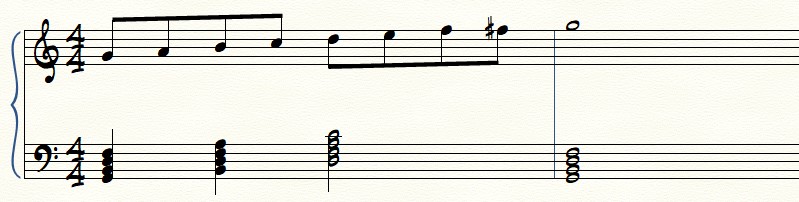
While it is certainly okay to get by with block chord voicings of harmony for an accompaniment (in fact, in some cases – that’s all that is needed for texture), there are many ways to make it more active and exciting. One of them is by breaking apart chords with a “boom-chick” style.
Take a chord progression for example:
Using the “boom-chick” style found commonly in guitar playing with the “boom” of the low bass note on the stronger beats and the “chick” of the higher chordal tones on the weaker beat, we get something like this:
This can be taken even further by rolling the chords as well as delay the individual voices of the “chick.” Also, if you want a more upward motion to your accompaniment, repeat the “chick” chord voice again, but drop the lowest note to get rid of – what you can call the “excess weight” of the chord.
Thank you so much for taking the time to read! Feel free to comment, share, and subscribe for more daily tips below! Till next time.
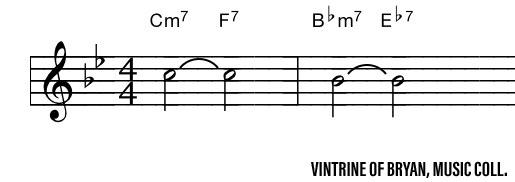
To remind for those who know, and to inform those that don’t, a sequence is a musical pattern or figure that is restated at a different pitch level while keeping the basic shape/contour/intervals of the original pattern.
Sequences tend to occur in classical music most often, especially in the melodic b-section of a phrase or period, but that should never limit a composer as to how to use a sequence! Exploring different uses of a sequential pattern of transposition in a figure can flourish a theme as well as bring a composition to an excitingly new harmonic destination.
When transposing a figure pattern up or down for a sequence, a composer will have to decide if things will remain exact or if there will be some modifications to the deviants – and this in turn will decide on where the composition will travel. First possibility is the keep the entire sequences diatonic to the key that the composition is in.
Another possibility is to make some changes by throwing in some accidentals to keep the exact intervallic patterns in each consecutive sequence. It might be wise to aim to not alter the tonal center, but there are no rules as to not doing so. So feel free to experiment!
Finally, sequence is not exclusively for melody. It can be used in harmony as well! A progression of the Circle Of Fifths in a key is a fundamental example of sequential use. Still, experimenting outside of the diatonic by using chromatic notes can allow the composer to reach different harmonic possibilities. So be creative and explore!
Thank you so much for taking the time to read! Feel free to comment, share, and subscribe for more daily tips below! Till next time.
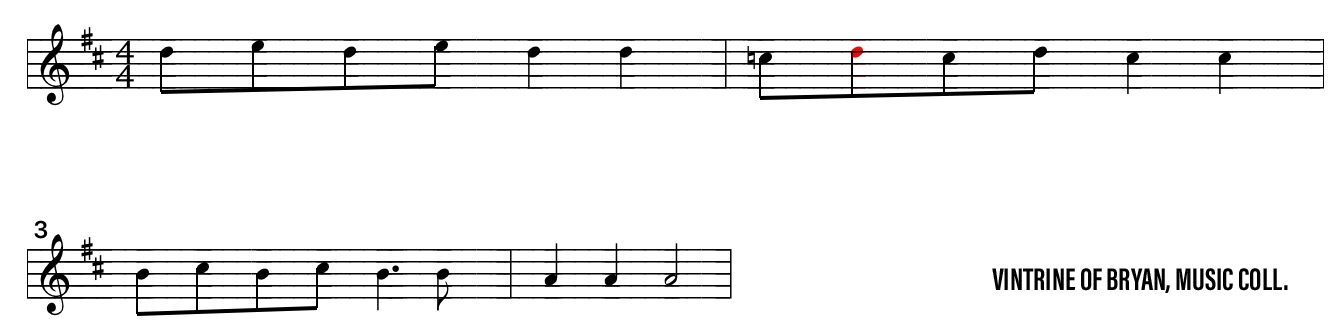
Repetition is one of the cornerstones to making a melody, theme, or in general – the piece of music itself, memorable to listeners. However, many composers abstain away from repeating the same material over-and-over again in their composition, as it is believed to be a sign of lacking in creativity or originality. Regardless of your opinion towards this matter, repeating a figure will not only help in becoming recognizable to the audience, but will also aid in developing a motif or theme. From Wagner’s epic themes to pop music ear-candy, repetition is a great technique that when used creatively can yield great results.
Two major aspects of a theme are the pitches and the rhythm. So let’s experiment with these two factors. An easy way to repeat is by simply rewriting the same phrase within a measure (with subtle variation) over again. Keep the pitches and rhythm roughly the same.
Still, the figure does not ever need to be constrained to the bar line. Having the figure be in a length longer/shorter in beats than the time signature can have surprising results!
Now, take out one of the variables. Keep the rhythm the same, but change the pitches. This will help in smoothly going from different harmonies to another.
And the opposite: keeping the same pitches, but changing the melody. This tends to not be as instantly recognizable to the ear, but the creativity in thematic development is very much still present.
Thank you so much for taking the time to read! Feel free to comment, share, and subscribe for more daily tips below! Till next time.
One of the most debated parts of music is the use of Western notation as well as the need to understand it. Even though this is the most common form of writing down music, most famous musicians tend not to know how to “read” it. Thus, it has come up for query as for the necessity to learn how to use this form of notation, as it doesn’t appear to have direct affect on success commercially or communication-wise. While the need may be up for question, excuses are certainly not. There is nothing standing in your way from learning how to read music and use it to compose, but yourself. Think of this as a language opportunity; and the more languages you know, the better you are when communicating your ideas to other musicians. It would be a shame for you to work hard to get into a recording studio, only to not be able to tell the players what you want in sound. So let’s start with the fundamentals:
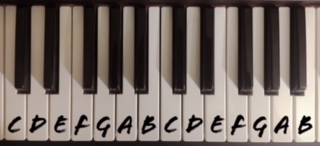
When looking at a score, or the physical musical notation for a piece of music, you will see a bunch of dots and lines. Each dot symbolizes a pitch, which is a particular tone that you hear. In this common practice of Western notation, the pitches are grouped into musical tone letter names of – A B C D E F G… repeating back to A and continuing on to infinity!
Take a look at a keyboard. All the white keys on the piano match the letter names mentioned above. You’ll also see that the groupings of white keys around the black keys are always 3-4-3-4… with the group of 3 being C D E and the group of 4 being F G A B constantly repeating. And now it is time to introduce our friend: middle C. Middle C is also called C4 because it is the fourth C (counting from the left) on a keyboard. This will serve as a placeholder in many situations, as seen coming up next.
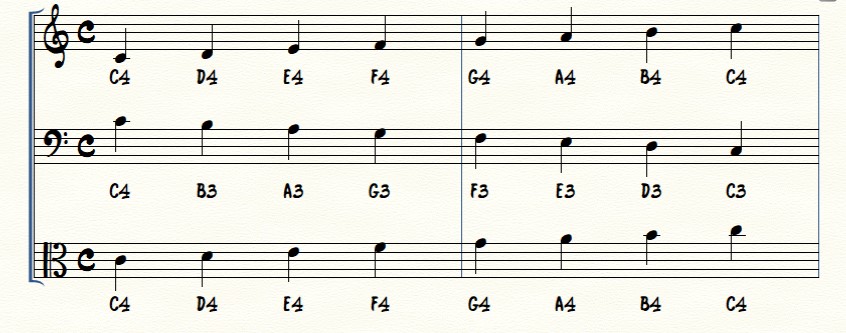
Now, these pitches are organized on a staff consisting of five lines and four spaces. The higher the pitch/dot is placed on the staff, the higher it sounds to the ear when you play it. And the opposite is true as well: the lower the pitch on the staff equals how low it will sound acoustically. So, now you might be wondering as to which line or space represents what pitch letter name – and the answer to that question is that it all depends of the clef. A clef is a symbol found to the far left end of any staff that tells the pitch representation.
First one is the treble clef, or otherwise known as the “g-clef.” It has that name from looking like a cursive “G” and having the swirl wrap around the line where G will be. Notice where C4 is in relation to this clef. Typically, treble clefs are used for high voices. So how about the low sounds? For that, we have the bass clef, also known as the “f-clef.” Once again getting its name from its shape, the two dots of the clef hug the line where F will be. Last, but not least, is the “movable” c-clef. The shape of this clef looks like two backwards “C”s connecting to each other in the middle – and the line on which they touch tells us where middle C is. Easy to remember. Reason why it is called a movable clef is because the clef can be on any line! If it was on the first line at the bottom, it would be a soprano clef; second line above, a mezzo-soprano clef; third middle line, alto clef; fourth line, tenor clef, and fifth top line, baritone clef. Alto clef, however, is by far the most commonly used.
One last final clef is the choral tenor clef, which looks like a treble clef, but with an “8” at the bottom of the tail. This tells us that the music sounds to our ear an octave, or eight letter names, lower than how it is visually written.
Thank you so much for taking the time to read! Feel free to comment, share, and subscribe for more daily tips below! Till next time.