Teach Yourself Music Theory – 42.) Improving Counterpoint Workflow

After beginning to compose your own counterpoint in the first species, you will begin to notice one thing… it is hard! Between all of the rules that you have to follow as well as all the other limitations you can think of, it might feel that every turn you take will lead you to a dead end.

One practice that will help you is to write between each of the staves the interval number. Like this:

This will help you keep track of your intervals and your harmonic movement as you work on your composition.

Another practice that can help your output when writing counterpoint is to keep to all consonant intervals except for the P5. This is for an invertible counterpoint option where you flip the lowest melodic line on top of the first. Flipping a P5 would get a P4, and that is not allowed.

So, with invertible counterpoint, you can get two pieces for the price of one!

Thank you so much for taking the time to read! Feel free to comment, share, and subscribe for more daily tips below! Till next time.

Teach Yourself Music Theory – 41.) First Species Counterpoint

In ways of teaching counterpoint, five species of counterpoint were developed to train the beginning composer the strict rules. These species get less strict with each one, but they still have many rules. It was the hope of music theory scholars prepare students for more full-fledged contrapuntal writing.

We will do the same with first species counterpoint, or “note-against-note” counterpoint where the ratio of notes between the and the newly added line and cantus firmus is 1:1. It should look something like this:

Now, it is time for the rules:

  • All downbeats (and therefore, all vertical harmonic intervals) must be consonant
  • Start all compositions on unisons, perfect fifths, or octaves.
  • End all compositions on unisons or octaves.
  • Only have unisons at the start or end of a composition, never in the middle.
  • Avoid no more than two perfect intervals in a row.
  • At most, the largest harmonic interval you should get is a major twelfth.
  • There must be some form of motion at all times.
  • Only approach perfect intervals by contrary or oblique motion.
  • Most of the motion should be stepwise
  • Skips should account for less than half of all melodic motion
  • Parallel motion can only be used 3 times in a row.
  • Try not to have both voices skip at the same time.
  • Attempt to fill large skips in before or after it.
  • Immediate repetition of a melodic idea is forbidden… unless it is spaced out.
  • No more than two sequential repetitions are allowed.
  • Cover the whole melodic range of the mode approximately every 10-20 notes.
  • Incorporate all other rules previously stated.

Thank you so much for taking the time to read! Feel free to comment, share, and subscribe for more daily tips below! Till next time.

Teach Yourself Music Theory – 40.) Counterpoint Harmony & Movement

As we begin to get further into the topic of Renaissance counterpoint, it is now time to add on some more terms, definitions, and rules.

The first term that will be introduced is the cantus firmus – a melody used in a consistent rhythm for other melodic lines to be added around it. Think of it as the “main melody” or basis for what all the other contrapuntal lines will be built around. A cantus firmus can be taken from a pre-existing melody or it can be originally composed.

As other melodic lines are being added to the cantus firmus, the composer must be mindful of the harmonic interval qualities. This, will probably come as a review:

  • Perfect Consonance – PU, P5, P8
  • Imperfect Consonance – m3, M3, m6, M6
  • Dissonance – m2, M2, P4, A4 / d5, m7, M7

Being mindful of your voice leading, the relationship between the melodic and harmonic dimensions in music, will help you create wonderful contrapuntal music.

Now, it is time to talk about movement and the different types:

  • Parallel Motion – when both voices move in the same direction over the same distance
  • Similar Motion – when both voices move in the same direction, but in different distances
  • Oblique Motion – when one voice stays put while the other one moves
  • Contrary Motion – when both voices move in opposite directions
  • No Motion – when both voices repeat their same pitch and don’t move

Keep these in mind as we continue to dive in deeper into the world of Renaissance counterpoint.

Thank you so much for taking the time to read! Feel free to comment, share, and subscribe for more daily tips below! Till next time.

Tip #249 – Neighbor Accents in Harmony

Take a look at the example below:

You will notice that the harmony doesn’t exactly stay the same within the measure – and that is due to the neighbor tones.

Not only does this bring interest to what would otherwise be a stagnant harmony within the context of the measure length, but it also brings attention to the individual notes that make up the harmony.

A trained ear can pick out the different notes that build a harmony, but when one voice changes with the use of neighbor tones, it takes interest to any listener.

Try it out!

Thank you so much for taking the time to read! Feel free to comment, share, and subscribe for more daily tips below! Till next time.

How To Beat Writer’s Block – Tip #21

Here is a game you can play for writing melody lines, bass lines, arpeggios, accompaniments, etc.

Let the root be a given. After that, decide on different scale degrees to form a shape that you will use for in a chord progression.

Like this:

Say I decide the root (given), the second, and fifth. Now, on each harmony, I can only play those scale degree in relation to the chord being played.

If the harmony is a G major triad, I would only play the G , A , and D during it.

So what’s the purpose of this? Well, for one, the limitations in note choices will force you to be creative. Second, this is just a starting point – merely a game – to get your writer’s block defeated.

Thank you so much for taking the time to read! Feel free to comment, share, and subscribe for more daily tips below! Till next time.

Tip #248 – Understanding the Navanitam Scale

The Carnatic music of South India has 72 scales (melakartas) comprised of seven different notes in either an ascending (arohana) or descending (avarohana) fashion. These scales are used in a kind of India music called rāga and are extremely beautiful. In addition these scales are grouped into different chakras, based on certain similarities.

Today’s melakarta is the Navanitam scale, the fourth scale from the seventh chakra.

Below is a representation of the scale as if it was put into Western notation:

Both the first (SA) and fifth (PA) scale degrees are in a placement normal to most scales found in Western music.  However, the lowered second (RI) and third (GA) scale degrees as well as the raised fourth (MA) degree creates chromatic lines.  Plus, it has a raised sixth degree (DHA).

Try playing around with the scale, possible harmonies, and progressions!

Thank you so much for taking the time to read! Feel free to comment, share, and subscribe for more daily tips below! Till next time.

Teach Yourself Music Theory – 39.) Beginning to Craft a Melody

As mentioned previously, Renaissance era counterpoint was vocal – but that doesn’t mean that they song only on “ooo”s and “ahh”s. Their lyrics usually came from liturgical texts, like psalms.

Before beginning to write a contrapuntal piece, one must be able to master the style of writing a single melodic line before trying to weave multiple independent lines together. This blog will talk about the process of doing so.

First thing you want to do is decide on the text you want to set to music.

Second, you will need to decide on the appropriate mode. Each mode has its own qualities an shades to best fit the mode of the text.

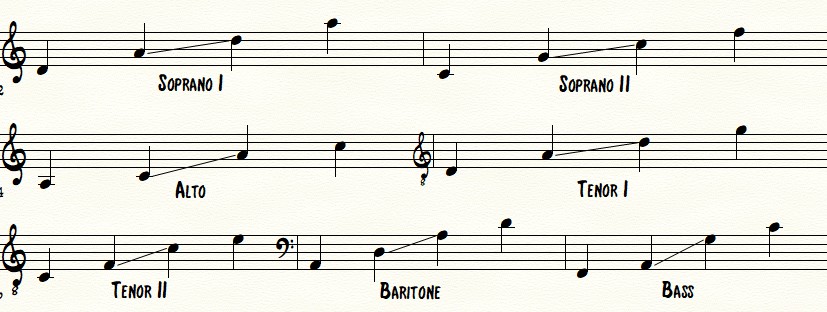
Third, you will want to assign the melody to the right voice. Look below at the different voice ranges. The out-most notes are the “extremes of the voice range, while the two pitches in the middle connected by a line suggest the comfort range:

Fourth, start the melody on the authentic or plagal pitch. Adjacent voices (when we start incorporating more melodic lines) with start on the opposite choice.

Fifth, start writing your melody to shape the text. Keep in mind:

  • Word Painting – doing something musical to invoke the images of the lyrics
  • Accenting important words with skips and leaps
  • Keeping the overall melodic line moving with stepwise motion instead of repeating notes
  • Be sure to cover the range of the mode within the limits of the vocalist without hitting the extremes too much
  • Have a interesting melodic contour
  • Avoid outlining or moving by dissonant intervals

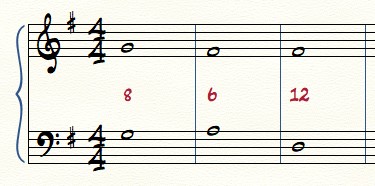
Sixth, cadence by stepwise motion from above or below.

  • The Dorian, Mixolydian, and Aeolian modes should have the their leading tones raised.
  • Ionian and Lydian already have natural leading tones and require no raising of pitches.
  • Phrygian has its own unique cadence of going down by half-step and going up by whole-step.
  • The Aeolian mode can have a “Phrygian cadence” by lowering the tone from above.

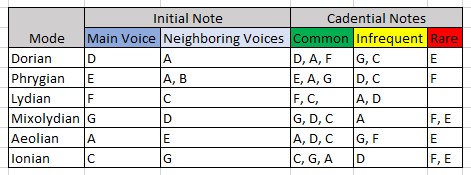
Below is a chart of the modes as if they were in the key of C:

Thank you so much for taking the time to read! Feel free to comment, share, and subscribe for more daily tips below! Till next time.

Improve Your Lyrics – Tip #52

In most cases when writing a song, the chorus will feature the title or at least the main line. The word or words that will stick in the listeners head even when the song is over.

But, where to you put the title line? At the beginning of the chorus or at the end?

Well, either option can work. However, deciding between putting the main line at the beginning or at the end can greatly impact how the message gets across to the listeners. Let’s take a look:

When you put the title line at the beginning of the chorus, you tell the audience just by the placement of the line that this is important. That of all the lyrical lines in the chorus, the first one is the most important. Plus, putting the title line at the beginning of the chorus allows you to repeat it if necessary throughout the rest.

Saving the title line for the end doesn’t give you the luxury of repeating it as much as if you were to put it in the beginning. However, it makes interest grow because you create suspension by saving the line (the punch) for the end. Just be sure you don’t drag it out so much that people forget it is the chorus.

Try both and see how you song works!

Thank you so much for taking the time to read! Feel free to comment, share, and subscribe for more daily tips below! Till next time.

Tip #247 – Setting a Sample to a Pitch

Sometimes, we just default to the idea that the sound sample that a person takes (whether of an instrument, pitch or unpitched, sound effect, etc.) should stay at its captured pitch.

Thanks to the advance in music technologies from the 1980’s to present-day, we have the ability to modulate the pitch of any sound. In addition, we have the ability to tune any captured sound to a frequency we desire.

Experiment with taking sounds like a kick drum, an explosion, a tap on the table, an animal sound, etc. and tune it to several different pitches. Then, try to use what you have melodically! Take advantage of the technology you have before you!

Thank you so much for taking the time to read! Feel free to comment, share, and subscribe for more daily tips below! Till next time.

Teach Yourself Music Theory – 38.) Melodic Restrictions

Music during the Renaissance era were written mostly for voice. As one would assume, the music made was in turn restricted by the capabilities of the voice. Meaning, that the range of the melody in Renaissance counterpoint was limited to that of voice (review the modes and see how each fit with a voice part). In addition, the melodic contour and interval make up of the melody had to be written at the ease of a vocalist. So, no difficult leaps or jumps!

Below is a chart of all the melodic intervals used for composing in the Renaissance era, their direction of ascending or descending, and how frequently they were used:

One thing to take note in the chart above is the banning of augmented and diminished intervals. In any natural key, there will be a tritone formed between two pitches. Not only does this ban include the melodic and harmonic intervals, but also the melodic outline. Meaning, a melody starting on F and ascending stepwise to B would be unacceptable because the melody spanned a tritone. Composers of the Renaissance era used musica ficta, accidentals, to get around this by flattening pitches to correct them to a P4 or P5.

Occasionally, musica ficta was used to raise pitches, but that would only appear at cadential points. Regardless, these accidentals are to be used as little as possible.

Besides that, there are some other rules to follow when constructing a melody:

  • Use steps more often than skips.
  • Precede and follow a large skip with stepwise motion in the opposite direction
  • Don’t use more than two skips in succession
  • Two skips in succession should cover a P5 or P8 in range.
  • Rarely, a P4 may follow a P4 in the same direction – same as P5’s.
  • An ascending P5 may be followed by a m3 in the same direction, if the mode is Dorian.
  • Attempt to stay within the “pyramid rule” of having larger intervals of skips in succession stay at the bottom.
  • Never have your melodic line outline a dissonant interval (expect for a m7).
  • Be cautious with repeating notes, as the melody becomes too stagnant.
  • Arrive at the extremes of you modal range with steps instead of skips.
  • Accidents are to be resolved in their proper manner (flats go down, sharps go up).

Thank you so much for taking the time to read! Feel free to comment, share, and subscribe for more daily tips below! Till next time.